BigQueryで連続した期間毎にまとめるSQLを作成する
ZOZO Advent Calendar 2024 4日目の記事になります。
今年もAdvent Calenderの時期がやってきました!今年は4記事ほど書く予定なので頑張りたいと思います。
今回は連続したデータが続く際、その連続したデータの期間毎にまとめたい場合どういったSQLクエリを書けばよいか紹介します。言葉だと難しいので例を用いて紹介できればと思います。
はじめに
下記テーブルを例にどのような結果を得たいのか説明できればと思います。
(例1)
| id | username | access_date |
|---|---|---|
| 1 | tom | 2024-05-01 |
| 1 | tom | 2024-05-02 |
| 1 | tom | 2024-05-03 |
| 2 | Thomas | 2024-05-01 |
| 2 | Thomas | 2024-05-02 |
| 2 | Thomas | 2024-05-03 |
| 3 | Sam | 2024-05-01 |
| 3 | Sam | 2024-05-02 |
| 3 | Sam | 2024-05-03 |
| 4 | Leo | 2024-05-01 |
| 4 | Leo | 2024-05-02 |
| 4 | Leo | 2024-05-03 |
上記テーブルはユーザーがアクセスした日付を記録するテーブルです。access_dateカラムにログインした日付が保存されます。
このテーブルに対してユーザーが連続何日アクセスしているか調べたいためSQLを用いて抽出します。
まず、どういう結果がほしいのか下記表にまとめます。
id毎にグルーピングを行い、各ユーザーの連続ログイン期間をaccess_start_dateとaccess_start_dateで表します。
| id | username | access_start_date | access_end_date |
|---|---|---|---|
| 1 | tom | 2024-05-01 | 2024-05-03 |
| 2 | Thomas | 2024-05-01 | 2024-05-03 |
| 3 | Sam | 2024-05-01 | 2024-05-03 |
| 4 | Leo | 2024-05-01 | 2024-05-03 |
クエリの作成
上記表の結果が得られるようなクエリを作成していきます。
まず簡単に思いつくクエリとしてMIN, MAX関数を利用しaccess_dateカラムに対してid毎の日付を抽出するようなクエリを例として作成してみます。下記クエリがMIN, MAX関数を利用したクエリになります。
SELECT
  id,
  username,
  MIN(access_date) AS access_start_date,
  MAX(access_date) AS access_end_date
FROM
  `sample_project.dataset.table`
GROUP BY
  id,
  username
ORDER BY id ASC
結果は下記スクリーンショットになります。先程提示した抽出結果と同じ結果になっています。

結果だけ見るとMIN, MAX関数を利用したクエリで良さそうですが、下記テーブルのような形になると得たい結果に対して差異が発生してしまいます。
(例2)
| id | username | access_date |
|---|---|---|
| 1 | tom | 2024-05-01 |
| 1 | tom | 2024-05-02 |
| 1 | tom | 2024-05-03 |
| 2 | Thomas | 2024-05-01 |
| 2 | Thomas | 2024-05-02 |
| 2 | Thomas | 2024-05-04 |
| 2 | Thomas | 2024-05-05 |
| 3 | Sam | 2024-05-02 |
| 3 | Sam | 2024-05-03 |
| 4 | Leo | 2024-05-01 |
| 4 | Leo | 2024-05-03 |
例1のテーブルと違い、同じidでも連続してアクセスした期間が分かれています。
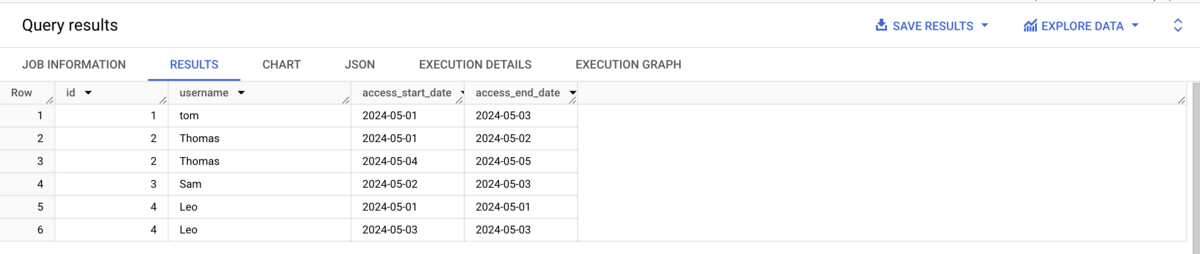
上記テーブルに対して期待する結果は下記になります。id=2とid=4のユーザーは連続してアクセスしていない日付があるため、レコードが2つ存在します。
| id | username | access_start_date | access_end_date |
|---|---|---|---|
| 1 | tom | 2024-05-01 | 2024-05-03 |
| 2 | Thomas | 2024-05-01 | 2024-05-02 |
| 2 | Thomas | 2024-05-04 | 2024-05-05 |
| 3 | Sam | 2024-05-02 | 2024-05-03 |
| 4 | Leo | 2024-05-01 | 2024-05-01 |
| 4 | Leo | 2024-05-03 | 2024-05-03 |
例2のテーブルに対してMIN, MAX関数を利用したクエリを実行すると下記結果になります。途中で区切れた期間もまとまってしまっています。

上記の結果よりMIN, MAX関数のみでは連続した期間を抽出できないことがわかりました。このクエリを改良し、途中で区切れた期間に対しても考慮できるようにします。
改良を行い、途中で区切れた期間に対しても対応できるようになったクエリが下記になります。
WITH add_a_column_zero_if_the_record_matches_yesterday_otherwise_one as (
  SELECT
    *,
    CASE
      WHEN
          id = LAG(id) OVER (PARTITION BY id ORDER BY  access_date) AND
          username = LAG(username) OVER (PARTITION BY id ORDER BY  access_date) AND
          date_diff(access_date, LAG(access_date) OVER (PARTITION BY id ORDER BY access_date), DAY) = 1
      THEN 0 ELSE 1
    END AS zero_if_the_record_matches_yesterday_otherwise_one
  FROM `sample_project.dataset.table`
), same_record AS (
  SELECT
    *,
    SUM(zero_if_the_record_matches_yesterday_otherwise_one) OVER (PARTITION BY id ORDER BY access_date ASC ROWS BETWEEN UNBOUNDED PRECEDING AND CURRENT ROW) AS total_value_with_the_same_id
  FROM add_a_column_zero_if_the_record_matches_yesterday_otherwise_one
)
SELECT
  id,
  username,
  MIN(access_date) AS access_start_date,
  MAX(access_date) AS access_end_date
FROM same_record
GROUP BY
  id,
  username,
  total_value_with_the_same_id
ORDER BY id ASC
クエリを実行した結果下記結果になります。例2のテーブルに対して期待した結果と同じ結果が得られることが確認できます。
クエリの説明
クエリをwith句単位で区切って説明します。
まず最初のクエリになります。
SELECT
    *,
    CASE
      WHEN
          id = LAG(id) OVER (PARTITION BY id ORDER BY  access_date) AND
          username = LAG(username) OVER (PARTITION BY id ORDER BY  access_date) AND
          date_diff(access_date, LAG(access_date) OVER (PARTITION BY id ORDER BY access_date), DAY) = 1
      THEN 0 ELSE 1
    END AS zero_if_the_record_matches_yesterday_otherwise_one
FROM `sample_project.dataset.table`
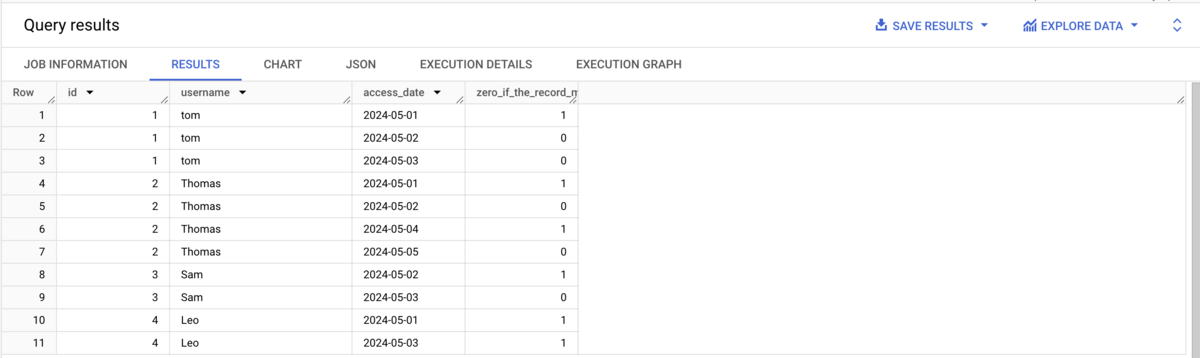
このクエリではwindow関数を利用し、PARTITION BYで区切ったレコードに対して現在のレコードに対する前のレコードの日付が昨日かどうか確認しています。前日と連続していれば0, 2日以上期間が空く場合は1が格納されるzero_if_the_record_matches_yesterday_otherwise_oneカラムを追加します。
このクエリの結果は下記になります。
次のクエリになります。
SELECT
    *,
    SUM(zero_if_the_record_matches_yesterday_otherwise_one) OVER (PARTITION BY id ORDER BY access_date ASC ROWS BETWEEN UNBOUNDED PRECEDING AND CURRENT ROW) AS total_value_with_the_same_id
FROM add_a_column_zero_if_the_record_matches_yesterday_otherwise_one
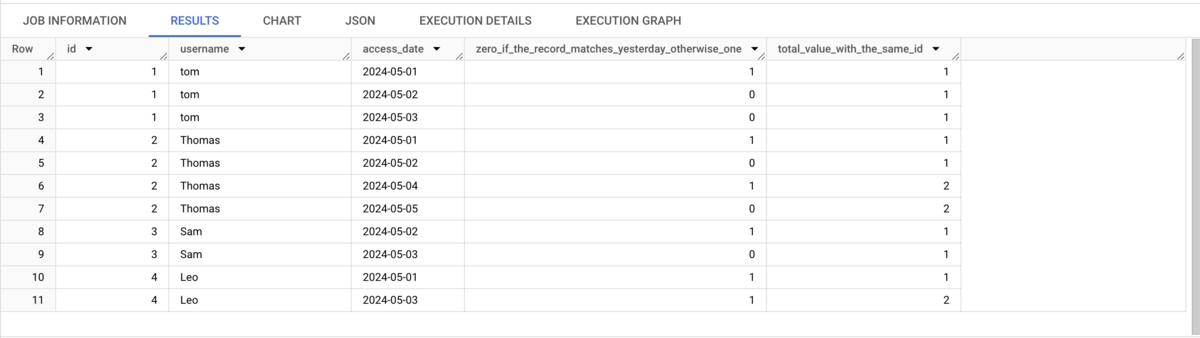
このクエリでは前回のクエリで追加したzero_if_the_record_matches_yesterday_otherwise_oneカラムに対してwindow関数を利用し、現在行までの総和を格納するtotal_value_with_the_same_idカラムを追加しています。``zero_if_the_record_matches_yesterday_otherwise_one```カラムは2日以上期間が空く場合1が格納さるので、連続していないレコードがあった場合は+1されます。なので連続しているレコードに対して同じ数字を返します。
このクエリの結果は下記になります。
最後にtotal_value_with_the_same_idカラムを利用して連続した期間をまとめ上げます。
SELECT
  id,
  username,
  MIN(access_date) AS access_start_date,
  MAX(access_date) AS access_end_date
FROM same_record
GROUP BY
  id,
  username,
  total_value_with_the_same_id
ORDER BY id ASC
まとめ
うまく連続した期間をまとめることができました。テーブル内に途切れたレコードが発生せず、すべてのレコードが連続している場合はMIN, MAX関数のみで簡潔に書けますが、途切れたレコードを加味する場合はwindow関数を利用した複雑なクエリになってしまいました。より簡潔に書けるような方法がある場合は教えていただけると嬉しいです。
Cloud Pub/SubのBigQuery Subscriptionでエラー内容を取得できるようになった話
ZOZO Advent Calendar 2023 23日目の記事になります。
これまでCloud Pub/SubのBigQuery SubscriptionにDead-letter topicを設定した際、Dead-letter topicに書き込まれた場合のエラー詳細を取得できませんでした。 例としてDead-letter topicに書き込まれた際、下記attributeが書き込まれます。何回書き込みに失敗したかはわかりますが、エラー内容についてはattributeへ書き込まれていません。
{
  "CloudPubSubDeadLetterSourceDeliveryCount": "5",
  "CloudPubSubDeadLetterSourceSubscription": "hoge",
  "CloudPubSubDeadLetterSourceSubscriptionProject": "project",
  "CloudPubSubDeadLetterSourceTopicPublishTime": "2023-07-19T04:09:56.723+00:00",
  "googclient_schemaencoding": "JSON",
  "googclient_schemaname": "projects/project/schemas/sample",
  "googclient_schemarevisionid": "11111"
}
12月時点でDead-letter topicに書き込まれたメッセージを確認すると、CloudPubSubDeadLetterSourceDeliveryErrorMessageが新しく追加され、BigQueryのテーブル書き込み時のエラーを確認できるようになりました。
{
  "CloudPubSubDeadLetterSourceDeliveryCount": "5",
  "CloudPubSubDeadLetterSourceDeliveryErrorMessage": "Error Detail",
  "CloudPubSubDeadLetterSourceSubscription": "hoge",
  "CloudPubSubDeadLetterSourceSubscriptionProject": "project",
  "CloudPubSubDeadLetterSourceTopicPublishTime": "2023-12-21T17:05:38.712+00:00",
  "googclient_schemaencoding": "JSON",
  "googclient_schemaname": "projects/project/schemas/sample",
  "googclient_schemarevisionid": "1111"
}
jsonデータだけの説明だとどのような挙動かわからないため、試しに検証環境を準備して書き込まれるか確認します。
検証環境の準備
Topicの作成
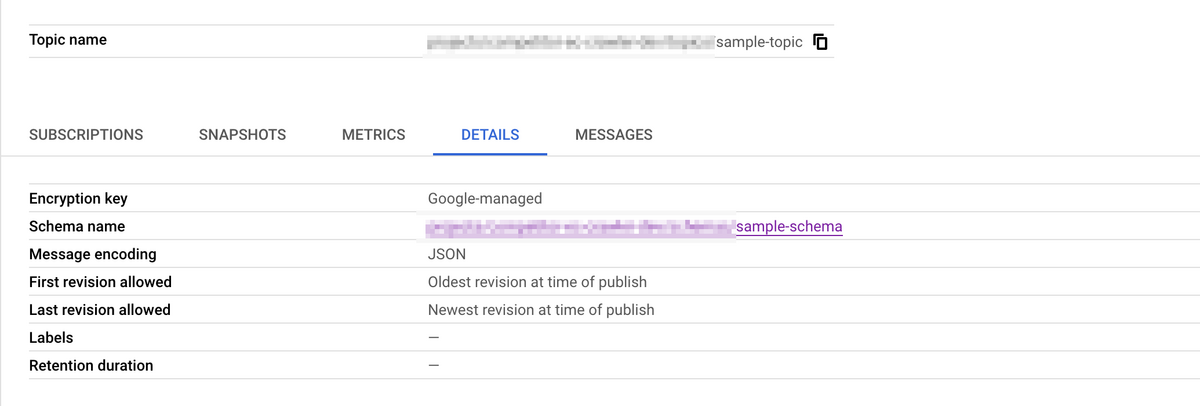
メッセージをPublishするTopicとDead-letter topic用のTopicを作成します。
メッセージをPublishするTopicをsample-topic、Dead-letter topic用のTopicをdeadletter-topicと名付けて作成します。

Tableの作成
下記テーブルスキーマでhogehogeというテーブルを作成します。
{
   "fields":[
      {
         "name":"sample_timestamp",
         "type":"TIMESTAMP",
         "mode":"NULLABLE"
      }
   ]
}
BigQuery Subscriptionの作成
下記設定でBigQuery Subsciptionを作成します。正常時はBigQueryに作成したテーブル(hogehoge)へ書き込まれるようにし、エラー時はDead-letter topic(deadletter-topic)へ書き込まれます。

動作確認
正常系のメッセージと異常系のメッセージをそれぞれPublishし、Dead-letter topicへ書き込まれた際の挙動を確認します。
正常系のメッセージ
下記jsonデータをtopicへPublishします。
{
   "sample_timestamp":"2023-12-23 10:00:00"
}
BigQuery Subscriptionに紐づいているテーブルを確認すると、きちんと書き込まれていることが確認できます。

異常系のメッセージ
次に下記jsonデータをtopicへPublishします。BigQueryのテーブルスキーマはtimestamp型なのでこのjsonデータはBigQueryへ書き込まれずDead-letter topicへ書き込まれるはずです。
{
   "sample_timestamp":"aaaaaaaa"
}
下記コマンドを実行し、Dead-letter topicに紐づいているSubscriptionを確認します。
gcloud pubsub subscriptions pull deadletter-subscription --format=json
上記コマンドを実行し、取得できたjsonデータは下記になります。CloudPubSubDeadLetterSourceDeliveryErrorMessageにBigQueryへinsertできなかった原因が書き込まれていることがわかります。
{
  "ackId": "",
  "message": {
    "attributes": {
      "CloudPubSubDeadLetterSourceDeliveryCount": "5",
      "CloudPubSubDeadLetterSourceDeliveryErrorMessage": "Could not parse 'aaaaaaaa' as a timestamp. Required format is YYYY-MM-DD HH:MM[:SS[.SSSSSS]]",
      "CloudPubSubDeadLetterSourceSubscription": "bigquery-subscription",
      "CloudPubSubDeadLetterSourceSubscriptionProject": "",
      "CloudPubSubDeadLetterSourceTopicPublishTime": "2023-12-23T09:25:44.378+00:00",
      "googclient_schemaencoding": "JSON",
      "googclient_schemaname": "sample-schema",
      "googclient_schemarevisionid": ""
    },
    "data": "",
    "messageId": "",
    "publishTime": "2023-12-23T09:25:48.511Z"
  }
}
まとめ
BigQuery Subscriptionを利用し、Dead-letter topicへ送られたデータのエラー原因を取得できるようになっていました。BigQuery Subscriptionを利用しはじめた当初はエラー原因が取得できず都度データを再度Publishして検証する手間があったので非常にありがたいです…!
Cloud Pub/Sub Topicへメッセージを短時間で大量にPublishする
ZOZO Advent Calendar 2023 21日目の記事になります。
今回紹介する記事は、Cloud Pub/Sub Topicへメッセージを大量にPublishする方法になります。Cloud Pub/Subの背後に連携したリソースの負荷試験や、データのスループットを計測したい際、大量のメッセージを短時間でPublishしたい時があります。一つ一つのメッセージをPublishしてresultメソッドを呼び出してもメッセージのPublishが遅くなるのである程度まとめてPublishするようなロジックを作成します。
基本的な部分はGoogle Cloudの下記記事と同じようなロジックになります。
検証バージョン
Python 3.12
google-cloud-pubsub 2.19.0
実装
from concurrent import futures
from google.cloud import pubsub_v1

project_id = ""
topic_id = "test-topic"

# データ量に応じて調節する
batch_settings = pubsub_v1.types.BatchSettings(
    max_messages=1000,
    max_bytes=1024 * 1024,
    max_latency=10,
)
publisher = pubsub_v1.PublisherClient(batch_settings)
topic_path = publisher.topic_path(project_id, topic_id)
sample_messages = []
# generate publish data
for i in range(1, 10001):
  sample_message = f"Sample Message {i}"
  sample_messages.append(sample_message)

loop_count = 0
publish_futures = []
print("Start publishing message")
for sample_message in sample_messages:
  message = sample_message.encode("utf-8")
  future = publisher.publish(topic_path, message)
  publish_futures.append(future)
  if len(publish_futures) >= 1000:
    futures.wait(publish_futures, return_when=futures.ALL_COMPLETED)
    publish_futures = []

  loop_count += 1
  if loop_count % 1000 == 0:
    print(f"publish progress: {loop_count}")

print("Messages published")
仕組みについて
より多くのメッセージをPublishするためPythonの標準ライブラリであるconcurrent.futuresを利用します。Pub/Sub Clientのpublishメソッドは返り値にfutureオブジェクトを返します。futuresオブジェクトの監視を行うため、その後publish_futuresというリストに返されたfutureオブジェクトをappendします。ある程度publish_futuresリスト内にfutureオブジェクトが溜まってきたら、futures.waitメソッドを呼び出し、publish_futuresリスト内に存在するすべてのfutureオブジェクトが完了するのを待ちます。 上記のロジックにすることでfutureオブジェクトを任意の量生成してメッセージをまとめてpublishできます。
まとめ
futuresオブジェクトをうまく利用しメッセージを短時間でPublishするようなロジックを作成できました。あくまで実装方法の一つなので他に良い実装方法を知っている方は是非教えて下さい!
AvroSchemaでNullが許可されたデータ型をGo言語の構造体で表現する
ZOZO Advent Calendar 2023 10日目の記事になります。
特殊な例だと思うのですが、今回はAvroSchemaでNullが許可されているデータ構造をGo言語の構造体で表現する方法を紹介します。
AvroShemaについて
AvroShemaはデータのシリアライズフォーマットです。データがバイナリフォーマットされるのでデータサイズが小さい状態で送信できます。 詳しい説明はドキュメントに書かれているので下記ドキュメントをご確認ください。
Union型について
Union型はAvroSchemaで定義されている型の一つで、Complex Typesで定義されているデータ型の一つになります。 JSON配列をtypeフィールドで指定できるので複数の型を定義できます。今回はstring型やint型が定義されているPrimitive TypesにNullを許可するために利用します。
Nullが許可されたデータの構造例
例としてString型にNull許可された場合のUnion型を定義します。
[
  {
    "name": "animal",
    "doc": "sample",
    "type": [
      "null",
      "string"
    ],
    "default": null
  }
]
上記の定義に対して許可されるJSONのデータ構造はがNullかそうでないかで2パターンあります。 まずデータがNullの場合についてのデータ構造を紹介します。
{
   "animal":null
}
次にデータがNull以外だった場合のデータ構造になります。
{
   "animal":{
      "string":"cat"
   }
}
上記2パターンを見ると、データがNullかそうでないかでJSONの構造が若干変わります。
実装背景
具体的な実装に入る前に、どのような場面での利用を想定しているのか説明します。
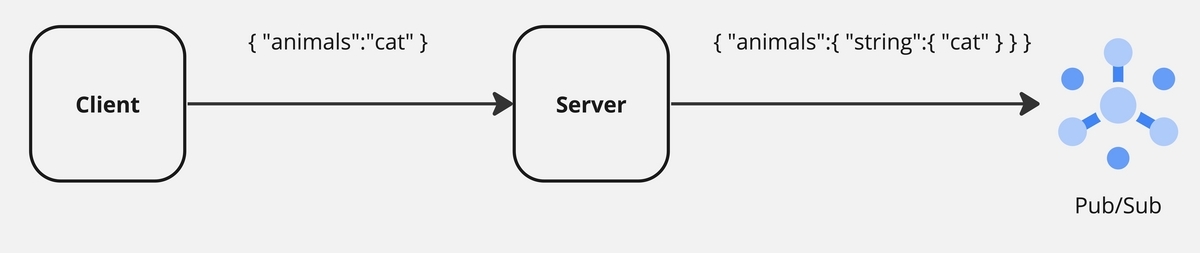
データの流れは図の矢印で表しています。Union型はデータの構造が変わるため、Client側で送信するデータ構造を変えずにCloud Pub/SubへAvroSchemaの仕様に沿ったデータを送るような流れを実装します。 Cloud Pub/SubにAvroSchemaの仕様に沿ったデータを送る理由については、Pub/Sub Schemaという機能を利用するためです。Pub/Sub Schemaを利用するとAvroSchemaを用いて送られるデータのValidationを行えます。
具体的な実装
実装方針として、まず送られてきたデータをmappingする構造体を定義します。一旦構造体にデータを落とし込んだ後Union型用に定義した構造体へ変換します。
package main

import (
    "encoding/json"
    "fmt"
)

// 受け取ったデータをmappingする構造体
type Animal struct {
    Animal *string `json:"animal,omitempty"`
}

type TransformAnimal struct {
    Animal *StringUnion `json:"animal"`
}

type StringUnion struct {
    StringValue *string `json:"string,omitempty"`
}

func TransformStringUnion(stringValue *string) *StringUnion {
    if stringValue != nil {
        return &StringUnion{
            StringValue: stringValue,
        }
    }
    return nil
}

func main() {
    // nullの場合
    json_data := `
  {
      "animals": null
  }
  `
    nullAnimal := Animal{}
    err := json.Unmarshal([]byte(json_data), &nullAnimal)
    if err != nil {
        panic(err)
    }
    transformedNullAnimal := TransformAnimal{
        Animal: TransformStringUnion(nullAnimal.Animal),
    }
    marshaledTransformedNullAnimal, err := json.Marshal(transformedNullAnimal)
    if err != nil {
        panic(err)
    }
    fmt.Println(string(marshaledTransformedNullAnimal))

    // null以外の場合
    nonNullMessage := `
  {
      "animal": "cat"
  }
  `
    nonNullAnimal := Animal{}
    err = json.Unmarshal([]byte(nonNullMessage), &nonNullAnimal)
    if err != nil {
        panic(err)
    }
    transformNonNullAnimal := TransformAnimal{
        Animal: TransformStringUnion(nonNullAnimal.Animal),
    }
    marshaledTramsformedNonNullAnimal, err := json.Marshal(transformNonNullAnimal)
    if err != nil {
        panic(err)
    }
    fmt.Println(string(marshaledTramsformedNonNullAnimal))
}
実際に実行すると、下記出力結果が得られます
// nullの場合
{"animal":null}

// null以外の場合
{"animal":{"string":"cat"}}
まとめ
少し特殊な事例でしたが、Nullが許可されているデータの構造をGo言語の構造体で表現できました。
Github ActionsのComposite Actionを利用して他リポジトリへPRを送る雛形を作成する
ZOZO Advent Calendar 2023 4日目の記事になります。
こんにちは!今年もAdvent Calenderの時期がやってきました!小ネタを絞り出して記事を書こうかと思います。
はじめに
皆さんはGtihub Actionsの複合アクション(Composite Action)を利用したことがありますか?Github ActionsでCIを作成しているとWorkflowの処理に似通った処理をするStepが出てくると思います。2-3stepで処理が済めば良いのですが、5-10stepくらいにまたがる処理の場合はWorkflowの見通しが悪くなり、修正も大変になります。この問題を解決するのがComposite Actionになります。 今回はComposite Actionの使用例としてCIから他リポジトリへPRを作成するような処理を紹介します。Composite Actionの基本的な利用方法は下記ドキュメントにまとまっているので併せてご確認ください。
仕組みの説明
具体的なComposite Actionの中身を見る前にどのような仕組みを作りたいか簡単に説明します。 利用背景例として設定ファイルを管理するリポジトリがあり、設定ファイルを任意のタイミングで他リポジトリへ反映したい場合を考えます。イメージとして下記図のような形でPRを送る形にすれば、他リポジトリの設定を任意に更新できます。

Composite Actionの実装
下記実装がComposite Actionの実装になります。
処理の流れとしては、最初に設定を同期したいリポジトリをCheckoutします。次に設定ファイルが配置されている場所(今回はdownload-artifactを利用しています)と同期するリポジトリ内のファイルをrsyncコマンドで同期します。最後に同期したディレクトリのdiffを確認して、必要であればPRを作成するような処理になります。汎用性を持たせるためにinputs部分で諸々パラメータを渡せるようにしています。
name: 'Create github pull request'
description: 'Create github pull request and sync data'
inputs:
  sync-source-and-destination-dir:
    description: 'Receive json data to sync another respository directories. ex: [{"source_dir": "source_dir", "dst_dir": "dst_dir"}]'
    required: true
  download-artifact-name:
    description: 'download artifact name'
    required: true
  download-artifact-path:
    description: 'download artifact path'
    required: true
  branch-name:
    description: 'branch name'
    required: true
  pull-request-title:
    description: 'pull request title'
    required: true
runs:
  using: "composite"
  steps:
    - name: delete branch if exists
      run: |
        git push origin :${{ inputs.branch-name }} || true
      shell: bash

    - name: create branch
      run: |
        git switch -c ${{ inputs.branch-name }}
      shell: bash

    - name: show cuurent branch
      run: |
        git branch
      shell: bash

    - name: Extract to an appropriate directory
      uses: actions/download-artifact@v3
      with:
        name: ${{ inputs.download-artifact-name }}
        path: ${{ inputs.download-artifact-path }}

    - name: set git config
      run: |
        git config user.name github-actions
        git config user.email github-actions@github.com
      shell: bash
    # 同期するディレクトリを指定する
    - name: sync data and add git
      run: |
        for row in $(echo '${{ inputs.sync-source-and-destination-dir }}' | jq -c '.[]'); do
          source_dir=$(echo $row | jq -r '.source_dir')
          dst_dir=$(echo $row | jq -r '.dst_dir')
          rsync -v --delete -d $source_dir $dst_dir
          git add $dst_dir
        done
      shell: bash
    # diffを確認して後続の処理を行うかを判断する
    - name: check diff
      id: changes
      run: |
        diff_file=`git diff --cached --name-status | wc -l`
        if [ $diff_file -gt 0 ]; then
          echo "skip_ci=true" >> $GITHUB_OUTPUT
        else
          echo "skip_ci=false" >> $GITHUB_OUTPUT
        fi
      shell: bash

    - name: git commit
      if: ${{ steps.changes.outputs.skip_ci != 'false' }}
      run: |
        git commit -m "update views" ${DOWNLOAD_PATH}
      shell: bash

    - name: git push
      if: ${{ steps.changes.outputs.skip_ci != 'false' }}
      run: |
        git push origin HEAD
      shell: bash
    # gh commandを利用するための認証
    - name: gh command authorization
      if: ${{ steps.changes.outputs.skip_ci != 'false' }}
      run: |
        echo ${PERSONAL_ACCESS_TOKEN} > token.txt
        gh auth login --with-token < token.txt
      shell: bash

    # PRの作成
    - name: create Pull Request
      if: ${{ steps.changes.outputs.skip_ci != 'false' }}
      run: |
        gh pr create --title "${{ inputs.pull-request-title }}" --body "- [ ] ${{github.event.pull_request.html_url}}"
      shell: bash
Composite Action呼び出し側の実装
Composite Actionの呼び出し側は下記イメージで呼び出します。呼び出し部分はSync backend repository directories and Create PRというjobで行われます。with部分でComposite Actionに渡すパラメータを指定しています。sync-source-and-destination-dirはjsonでパラメータを渡すようにできており、PRを作成したいリポジトリの複数ディレクトリを同期できるようにしています。
name: "sample"

on:
  pull_request:
    branches:
      - 'main'
    types: [opened, synchronize, closed]

jobs:
  backend-pr:
    runs-on: ubuntu-latest
    env:
      PERSONAL_ACCESS_TOKEN: ${{ secrets.PERSONAL_ACCESS_TOKEN }}
      DOWNLOAD_NAME: config_files
    steps:
      # PRを作成したいリポジトリをチェックアウト
      - uses: actions/checkout@v3
        with:
          token: ${{ env.PERSONAL_ACCESS_TOKEN }}
          repository: hoge/backend

      - uses: actions/checkout@v3
        with:
          path: fuga

      - name: Sync backend repository directories and Create PR
        # Composite Actionが格納されているディレクトリを指定
        uses: ./hoge/.github/actions
        with:
          branch-name: update-config-$(date "+%Y%m%d")
          download-artifact-name: ${{ env.DOWNLOAD_NAME }}
          download-artifact-path: ${{ runner.temp }}
          sync-source-and-destination-dir: '
            [{
              "source_dir": "${{ runner.temp }}/hoge_setting/",
              "dst_dir": "backend/hoge_setting/"
            },
            {
              "source_dir": "${{ runner.temp }}/fuga_setting/",
              "dst_dir": "backend/fuga_setting/"
            }]'
          pull-request-title: 'update settings $(TZ=JST-9 date +"%Y-%m-%d %T %Z")'
まとめ
Composite Actionを利用することで複数のstepにまたがる処理をまとめる事ができました。CIは気がついたらyamlの記述量が膨大になって見通しが悪くなることが多いのでComposite Actionで共通処理をうまくまとめてみると良さそうです
Apache BeamでBigQueryに書き込む際エラーログを出力する
ZOZO Advent Calendar 2022 13日目の記事です。
今回はApache Beam v2.41辺りで導入されたBigQueryに書き込む際、エラーが発生した場合のエラーメッセージを出力できるようになったので紹介します。
経緯
Apache Beam v2.40以前はBigQueryに書き込みエラーが発生した場合、dictが返されます。FailedRowsキーにテーブル情報、書き込もうとしたデータがtupleとして格納されています。しかし、エラーログに関しては取得できません。
公式の方ではdeadletter patternとして紹介されています。 beam.apache.org
import apache_beam as beam

class TestPipeline(beam.DoFn):
  def pipeline(self):
      table_id = ""
      options = beam.options.pipeline_options.PipelineOptions()
      with beam.Pipeline(options=options) as p:
        # hogeカラムはint型なのでエラーになる
        elements = (p | beam.Create([{"hoge": "fuga"}]))

        errors = (
          elements
          | 'Write to table' >> beam.io.gcp.bigquery.WriteToBigQuery(
            table=table_id,
            # エラーが発生した際リトライは行わない
            insert_retry_strategy=beam.io.gcp.bigquery_tools.RetryStrategy.RETRY_NEVER,
            )
        )
        # 書き込みに失敗した場合処理される
        ( errors["FailedRows"] | beam.Map(print) )
def run():
  test = TestPipeline()
  test.pipeline()

if __name__ == '__main__':
  run()
出力結果
# コンソール上にエラーログは出力される
ERROR:apache_beam.io.gcp.bigquery:There were errors inserting to BigQuery. Will not retry. Errors were [{'index': 0, 'errors': [{'reason': 'invalid', 'location': 'hoge', 'debugInfo': '', 'message': 'Cannot convert value to integer (bad value): fuga'}]}]
# printした結果。FailedRows内にエラーログは含まれていない
('competitor-ec-crawler-dev:temp.sample2', {'hoge': 'fuga'})
エラーログを取得できるようにする
検証環境
以下のバージョンで実装を行います。
Python 3.9
apache-beam 2.34.0
実装
実装は下記になります。内容はあまり変わっておらず、FailedRowsキーを指定した部分がfailed_rows_with_errorsメソッドで呼び出しています。
import apache_beam as beam

class TestPipeline(beam.DoFn):
  def pipeline(self):
      table_id = ""
      options = beam.options.pipeline_options.PipelineOptions()
      with beam.Pipeline(options=options) as p:
        # hogeカラムはint型なのでエラーになる
        elements = (p | beam.Create([{"hoge": "fuga"}]))

        errors = (
          elements
          | 'Write to table' >> beam.io.gcp.bigquery.WriteToBigQuery(
            table=table_id,
            # エラーが発生した際リトライは行わない
            insert_retry_strategy=beam.io.gcp.bigquery_tools.RetryStrategy.RETRY_NEVER,
            )
        )
        # 書き込みに失敗した場合処理される
        ( errors.failed_rows_with_errors | beam.Map(print) )
def run():
  test = TestPipeline()
  test.pipeline()

if __name__ == '__main__':
  run()
結果
WARNING:apache_beam.io.gcp.bigquery:There were errors inserting to BigQuery. Will not retry. Errors were [{'index': 0, 'errors': [{'reason': 'invalid', 'location': 'hoge', 'debugInfo': '', 'message': 'Cannot convert value to integer (bad value): fuga'}]}]
# printした結果。エラーログが含まれている
('competitor-ec-crawler-dev:temp.sample2', {'hoge': 'fuga'}, [{'reason': 'invalid', 'location': 'hoge', 'debugInfo': '', 'message': 'Cannot convert value to integer (bad value): fuga'}])
まとめ
無事にエラーログをプログラム上で取得できました。エラーになったデータを別のテーブルに書き込む際、エラーログも書き込みたい場合便利です。 他にも利用できるメソッドがあるので詳しくは下記ドキュメントをご覧ください。 beam.apache.org
Dataflowに送られてくるログサイズに制限をかける
ZOZO Advent Calendar 2021 22日目の記事です。
今回はDataflow内に送られてくるログサイズの制限を行う実装をします。
経緯
下記の構成図のようにCloud Pub/Subに送られてくるログをBigQueryにinsertするような処理をDataflowを用いて実装します。加えて、DataflowのStreaming機能を利用しリアルタイムでログをBigQueryへinsertします。

しかし、上記の構成でログをinsertする際BigQueryのquotas/limitsに引っかかる場合があります。 BigQueryのquotas/limitsは下記に記載されています。今回はStreaming機能を有効にしているのでStreaming insertsのquotas/limitsが適用されます。

特に今回はHTTP request size limitの項目に注目します。HTTP request size limitはstreaming insertのAPI(insertAll)へ一度に投げられるサイズ制限になります。制限量に関しては10MBあるので1ログメッセージ程度では制限に引っかかることはありません。しかしinsertAllは複数のinsertデータを含めることができます。
Dataflow側は複数insertできることを利用し、ある程度ログメッセージをまとめてinsertします。どれくらいまとめてinsertを行うかはDataflow側が決めており、流れてくるログ量によって変化します。なので、データのサイズが大きいログが短時間で大量に送られてくるとBigQueryの10MBのログ制限に引っかかってしまう場合があります。Dataflow側ではログのサイズを加味してinsertする量を調節しないので意図的にログサイズの確認を行い、大きいサイズのログが送られた場合は棄却する、切り詰める等の処理を行う必要があります。大きいサイズのログをどう処理するかに関しては要件によると思うのですが、今回はログサイズの切り詰めを行い、Deadletterテーブルへ書き込むような処理を紹介します。
検証環境
以下のバージョンで実装を行います。
Python 3.8.11
apache-beam 2.34.0
実装手順
以下の図のような実装を行います。
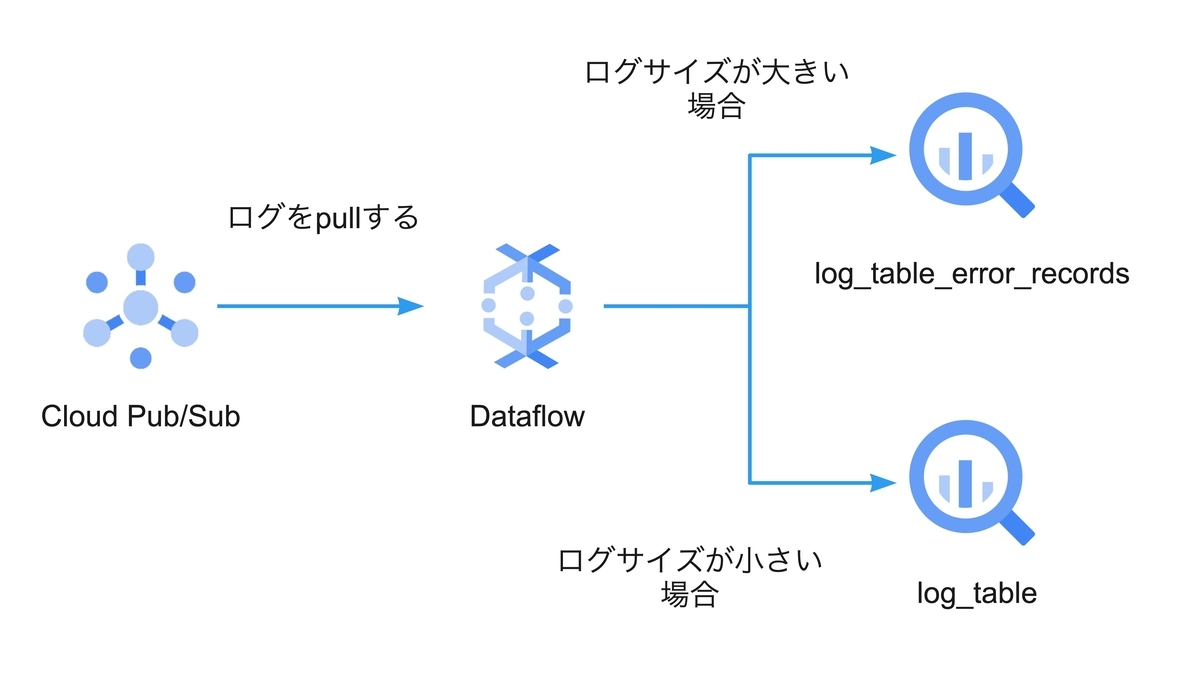
Dataflow内でCloud Pub/Subから送られてきたログに対してサイズの確認を行います。ログのサイズが規定のサイズより大きかった場合はdeadletterテーブル(log_table_error_records)へ、小さかった場合は正常のテーブル(log_table)へinsertします。
実装
具体的な実装は下記になります。
import os
import math
import apache_beam as beam

class ValidateLogSizeAndResizeLogSize(beam.DoFn):
  def __init__(self, max_log_kilobyte_size):
    self.max_log_kilobyte_size = max_log_kilobyte_size
    self.log_kilobyte_size = 0

  def _caluclate_log_size(self, log):
    serialized_log = json.dumps(log)
    log_byte_size = len(serialized_log.encode())
    log_kilobyte_size = math.floor(log_byte_size/1024)
    return log_kilobyte_size

  def _check_max_log_size_exceeded(self):
    return True if self.log_kilobyte_size > self.max_log_kilobyte_size else False

  def _resize_log_size(self, log):
    serialized_log = json.dumps(log)
    encoded_log = serialized_log.encode()
    return encoded_log[:self.max_log_kilobyte_size*1024].decode(errors='ignore')

  def process(self, log):
    self.log_kilobyte_size = self._caluclate_log_size(log)
    if self._check_max_log_size_exceeded():
      resized_log = self._resize_log_size(log)
      message = f"Event log size too large. Expected Max size is {self.max_log_kilobyte_size}kb. But recived {self.log_kilobyte_size}kb event log"
      yield beam.pvalue.TaggedOutput("failed_max_size", {"log": resized_log, "error_message": message})
      return
    else:
      yield log


def format_error_log(payload):
  return {'payloadString': json.dumps(payload["log"]), 'errorMessage': payload["error_message"],'timestamp': datetime.now(timezone.utc).strftime("%Y-%m-%dT%H:%M:%S.%fZ")}


class CustomOptions(PipelineOptions):
  @classmethod
  def _add_argparse_args(cls, parser):
    parser.add_argument('--batch_size', default=None, type=int, required=True)
    parser.add_argument('--max_log_kilobyte_size', default=None, type=int, required=True)

class TestPipeline(beam.DoFn):
  def __init__(self, argment):
    self.argment = CustomOptions()
  def pipeline(self):
      subscription_id="subscription_id"
      table_id = "table_id"
      with beam.Pipeline(options=self.argment) as p:
        checked_logs_size = (
            p
            | f"Read message from Cloud Pub/Sub" >> beam.io.gcp.pubsub.ReadFromPubSub(subscription=platform.pubsub_subsciption_id())
            | f"Convert json" >> beam.Map(json.loads)
            | f"Validate max logs size" >> beam.ParDo(ValidateLogSizeAndResizeLogSize(p._options.max_log_kilobyte_size)).with_outputs('failed_max_size', main='vailed_max_size')
            )

        (
            checked_logs_size.failed_max_size
            | f'Format error log' >> beam.Map(format_error_log)
            | f'Write to deadletter table' >> beam.io.gcp.bigquery.WriteToBigQuery(
            table=table_id + "_error_record",
            batch_size=p._options.batch_size
            )
        )

        (
            checked_logs_size.vailed_max_size
            | f"Write to BigQuery table" >> beam.io.gcp.bigquery.WriteToBigQuery(
            table=table_id,
            batch_size=p._options.batch_size
            )
        )


def run():
  test = TestPipeline()
  test.pipeline()

if __name__ == '__main__':
  run()
deadletterテーブルへのinsert及び正常テーブルのinsertはwith_outputsを利用しinsertするテーブルを変更しています。
BigQueryのinisertを行う関数はWriteToBigQuery関数です。引数にbatch_sizeを指定でき、一度にinsertできるmaxのレコード数を設定できます。デフォルトだと500が指定されており、場合によってはBigQueryのHTTP request size limitに引っかかる可能性があるのでオプションで任意の値に変更できるようにしています。
ログサイズの確認、リサイズを行う関数はValidateLogSizeAndResizeLogSize関数です。Dataflow起動時にオプションでログサイズの閾値を渡せるようにし、その閾値を用いて送られてくるログに対して比較を行います。
まとめ
送られてくるログに対してログサイズの制限を設けられました。送られてくるログサイズが小さい場合はBigQueryのquotas/limitsに引っかかることはないのですが、batch_sizeの設定やログサイズが大きい場合は何かしらの制限を設ける処理を追加することをおすすめします。閾値設定は毎秒どれくらいメッセージが送られてくるのかだったり、どれくらいのログサイズだったかで適宜変更する必要があるので、その際はこの記事の実装を参考にしていただければと思います。
